Here’s a Quick & Easy Way to Update Ordinary Picture Frames


I’ve been on the hunt for some picture frames for my son’s room ever since I came up with his rustic industrial design plan a couple of months ago. And yes, I’m still working on it, but it’s so close to being finished and I can’t wait to share the reveal with you.
This post may contain affiliate links. Please see my full disclosure policy for more details.
While searching for something masculine and rustic, I was inspired by these floating leather-strapped picture frames from CB2, but I was less than impressed with the price tag and needed to come up with an inexpensive alternative to get the look I was wanting. I do love a good challenge though and figured I could easily DIY my own version of a leather strapped picture frame for his bedroom.

I’m going to be real with you and tell you that my first plan for this project was an epic fail. I’m talking broken, shattered glass, tears of frustration, and cursing like a sailor right at the exact moment my toddlers walked in on me. Not my finest mom moment. But, I always end up learning a lesson, and this time, it was that I should have prepared better.
I didn’t research the material I was using or my method to see if it would actually hold up. So friends, without further ado, here’s take 2 of my DIY leather strap picture frame project and all the steps so that you can skip the tears and get right to the smiles because you are gonna love how this looks on your walls.
Supplies needed for the DIY leather strap picture frame
Total Cost per frame
$14.01 (for the knob, frame, and leather)
I love the modern look of floating frames and found a ton of options at my local At Home store, but I’ve also linked some similar options at the bottom of this post. For less than $10 apiece I was able to pick up all 3 frames for the price of the one that inspired me at CB2, so I’ll take that as a win.
The leather straps came from JoAnn Fabrics, and while I don’t intend for them to carry the weight of the frame (I’ll be attaching it to the wall with a screw), I still wanted it to have a thick sturdy appearance to complement the metal frames. While I really wanted brown leather, I settled for black, because it was all they had in stock and I was anxious to finish up the last project for my son’s bedroom. I still think it looks great though.
Bonus, these are real leather too, so you may want to unroll them from the package and reshape them a bit before you attach it to your frame.
Get started assembling your DIY leather strap picture frame
Step 1
First, remove the glass panes from your floating frame. Don’t be an eager beaver like me and try to staple your frames with the glass inserts still in place. It won’t turn out in your favor. What can I say, sometimes I just like to take shortcuts and I’m still learning from my lessons.
Step 2
Next, place your leather strip on the side of your frame where you’ll be attaching it. You’re going to assemble it to make a handle out of this leather strap so position it vertically down the side of the frame you want to hang it from.

Step 3
Then, nail the strap in place with your staple gun and be sure to push down firmly enough for the staple to go all the way through the thick leather strap. I was actually pleasantly surprised out how well the staple held the thick leather strap in place. This was so much easier than my first attempt using a faux pleather-like material.


Step 4
Install your wall knob that you’ll be hanging this from. I didn’t capture photos of this step because my hubby helped with this while I was busy with the toddlers. I used standard cabinet knobs so he had to saw the head of the screw off in order to insert these into the wall, but if you’re looking for an easier option I would purchase knobs that are specifically meant to be attached to walls.
Step 5
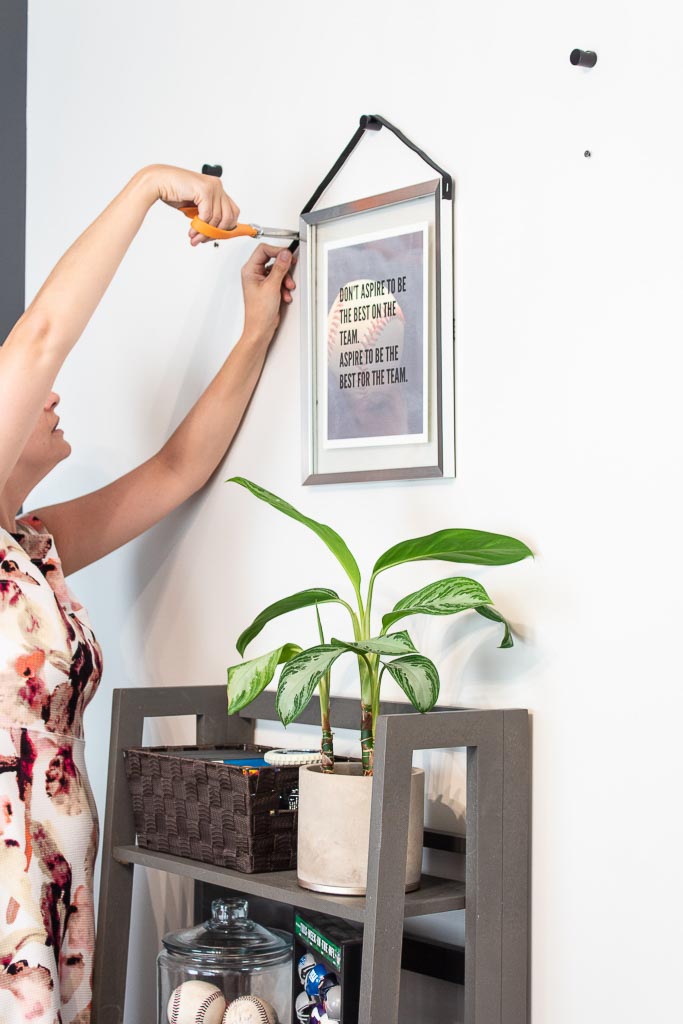
Position your frame on the knob to the desired length you want it hanging. Then, stretch the unattached leather strip to the other side to determine the length you’ll need to attach it. (I also chose to anchor a screw into the wall to hold my frames into place so they wouldn’t swing from the knobs) but you certainly don’t have to do this.


TIP – Remember above when I recommended unrolling your leather strip from the package to stretch it out first? This is to give the leather a chance to uncoil and straighten so that you end up with a nice straight piece for this step. I was impatient….learn from my mistakes.

Step 6
Finally, using the position you marked above, go ahead and attach your leather strip to the remaining side of the picture frame. There you have your leather handle attached to your frame and ready to be reassembled with the glass panes and hung on your wall.

I love how simple and easy this project was to complete and It added the perfect modern industrial touch to my son’s bedroom. I know you can see the staples in the leather, but since it matched the frame it really doesn’t bother me that much, although I might take a black sharpie to it if my OCD ges out of hand.


PIN this project for later
Drop me a comment below to let me know if this post inspired you to take on a DIY picture frame project in your own house and don’t forget to subscribe to my upcoming newsletter so you don’t miss a post!


Thank you for letting me include this post in my art display round-up. Great idea!
Thanks for sharing this Erin, love your post!
What a wonderful idea! I love the way the frames turned out. I love your blog!!
Thanks so much Sheila!