Here’s an Easy Inexpensive Way To Transform a Room With Trim


Learn how to transform any room in your home with simple DIY board and batten wall tutorial.

This post contains affiliate links. Please see my full disclosure policy for more details.
Ever walk down your dark hallway at home and feel a bit claustrophobic? Maybe you’ve tried switching out your light fixture to something brighter. You might have even painted the walls a lighter color (even though your heart loved that dark moody navy blue). I know I have.
I once painted my hallway twice. Twice. Because I was convinced that the paint color would make all the difference in brightening up my narrow hallway. But, it didn’t.
This was me on maternity leave when I discovered a super-easy way to make my tiny hallway feel more open. I also got up the nerve to work with some power tools while my hubby was away, even though he advised against it. I’m such a rebel, I know!

Here’s an easy solution to this problem! Consider adding some custom trim or molding to your walls to create visual interest. Now don’t be frightened at the word custom, be inspired by it. Because you can incorporate some relatively inexpensive materials onto your walls to give your space the appearance that it was always meant to be there, and made just to fit your home.
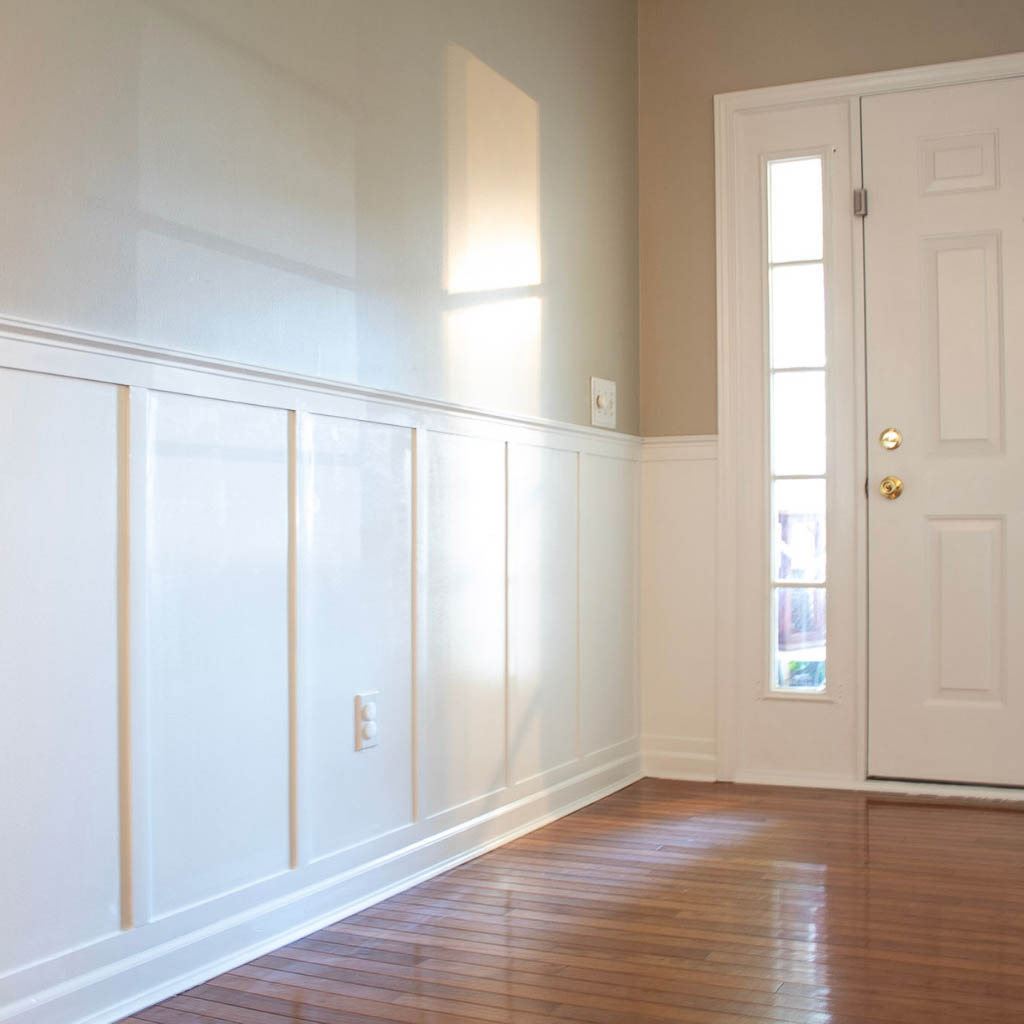
I have big plans for some pretty cool designs in our own home, but check out this transformation my husband and I recently completed for our friend’s entryway. The style is similar to the trim work we installed in the glam powder room makeover.


Total game changer right?!
So how do you get started to transform a room with trim?
Select your Colors
If you have your heart set on a particular color, that’s great! If you’re concerned at all that it might be too dark for your space then consider adding some contrast by including a second lighter color in the room. The paint color in this entryway hall was staying put, so we decided to split the wall into thirds with the bottom 1/3 of the wall being a white paint to brighten up the area, and the top 2/3 section would remain the same taupe color.
Check out the difference just from paint alone! The separation of colors really brightened up this dark hallway.


Decide on a trim pattern for your board and batten wall
This is where you can get creative and add in some fun texture to your walls! If you can dream up a pattern in your head whether it’s circles, squares, or heck even zig-zags, then you can apply it to your space.
Our friend wanted a traditional farmhouse feel with a board and batten look so we settled on tall thin rectangular boxes for the bottom half of the walls.

Choose a trim style
Just like there are endless ideas for patterns, there are so many unique trim and molding options to choose from. But I have a tried and true favorite that I’ve used in at least four different rooms now, and this one is a big impact at a low cost. Especially if you have a lot of square footage to cover like in this hallway project.
Friends, meet the basic pine lattice trim. Yup, lattice. That Cris Cross pattern you often see enclosing the bottom half of a deck outside. Just don’t get the outdoor pressure treated material because ya can’t use that stuff indoors.

The reason I go for this material so often is pretty simple. This trim happens to be about the exact same thickness as the top of your typical baseboards you see installed in every builder home out there. So if you’re trying to marry a look to fit your home, because this site is all about working with what you’ve got, then this is a great alternative to ripping up and replacing all of your existing baseboard trim.
We also decided to go with a thin traditional molding to cap off the top section of the pine strips and dress up the transition of the wall a bit.
Paint the background wall
Here’s a pro tip that will save you a TON of time. Before you install your trim, take some time to completely paint the background of your wall. It took us 3 coats to cover up this dark taupe, but can certainly take less depending on your original wall color.

Painting the wall before you begin will make the process go much faster than if you were trying to paint inside all of the individual patterns once you’ve already installed it. Not only does the process go much quicker, but you also avoid dreaded paint drips that can appear when you’re painting against joined surface areas.
Install your board and batten wall trim
Remember when I said I worked up the nerve to use power tools and install our trim while I was on maternity leave? I promise it’s not that intimidating for a first-timer. You just need to have a basic understanding of how to use these 4 tools:
- A measuring tape (yes I’m serious here. Measure twice, cut once)
- A level, because no one wants a crooked wall
- The miter saw
- A nail gun (super fun I promise!)
Be sure to measure and layout your pattern so that you’re ready for your install. It’s super important that you’ve measured accurately, especially if you’re going to space your pattern equal distance apart like we did for this project. You don’t want to get to the end of your wall and realize that your last piece is going to be smaller or larger than all of the others. So measure twice guys.
We began by installing the border around the wall and joining the corners at a 45-degree angle almost resembling a giant picture frame.

Do your best to use one long piece of trim for each of the sides of your border so that you can avoid any unnecessary seams. Having a partner for this part is crucial to keep your longer boards level while you nail them.

Next, we installed all of the vertical pieces in order to create the rectangular boxes inside the border. Nailing these pieces into studs whenever possible ensures ensure a tight fit against the wall and eliminates a lot of gapping between the trim and wall surface.


When you’ve made it this far, the rest is cake! The install is the longest time it takes for this entire process. And if you take the extra time to measure and plan it out, you will be set.
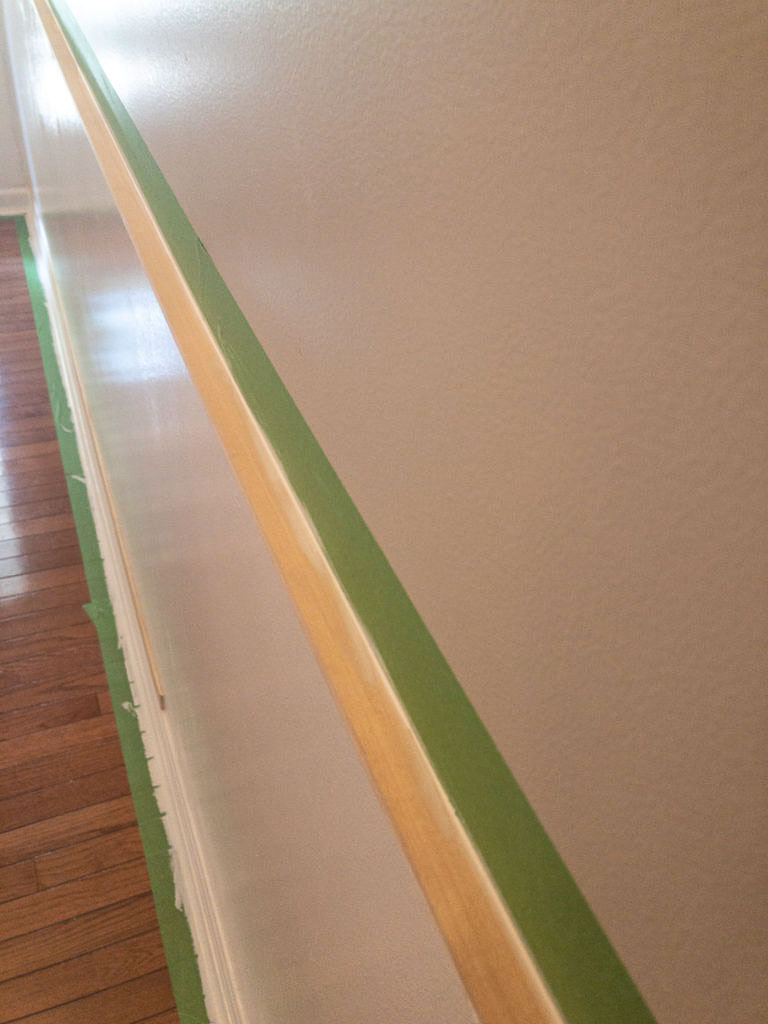
Caulk and Fill and sand the Nail Holes
Prep your surfaces as much as possible. You don’t want to try to cut any corners here or you will end up seeing gaping nail holes or gashes in your trim boards. Be sure to go through each and every nail hole and make sure to fill it with a fast-drying nail filler. I love using this nail filler because it turns from pink to white once dried, making it easy to know when the area is ready to sand.
Then you’re ready to caulk. This stuff is magic in a tube. It hides any imperfections you might make in the cutting or install process and it’s great for hiding seams and gaps. It makes your work look so much more professional even when you’re an amateur.

You’re going to want to caulk EVERY SINGLE PIECE of your trim where the wood meets the wall. Let me repeat that. EVERY SINGLE PIECE. You may not notice any gapping of boards against your walls, but I promise you that the minute you begin to paint, those gaps are there, and they WILL become visible.
PRO TIP
A super helpful trick my husband came up with, especially if you’re only going to be painting one portion of the wall, is to tape off the portion where the existing wall meets the new trim and leave a small gap about the thickness of a dime between the trim and your tape. This creates a barrier where the caulk can adhere to the wall while joining your seam and still provide a nice clean paint line.
It was genius. I only wish he had come up with it about 3 projects ago.
So take the extra time and thoroughly caulk all of your seams and joints for a more custom and finished look. This stuff dries pretty fast, and by the time you’ve finished caulking, you’re typically ready to move on to painting your wall.
Sand and paint your board and batten wall
Make sure you’ve sanded all of the patches for your nail holes so that you end up with a nice smooth finish. Also, do yourself a favor and vacuum up all of the dust from sanding so that you don’t wind up with dust particles in your nice clean paint job.
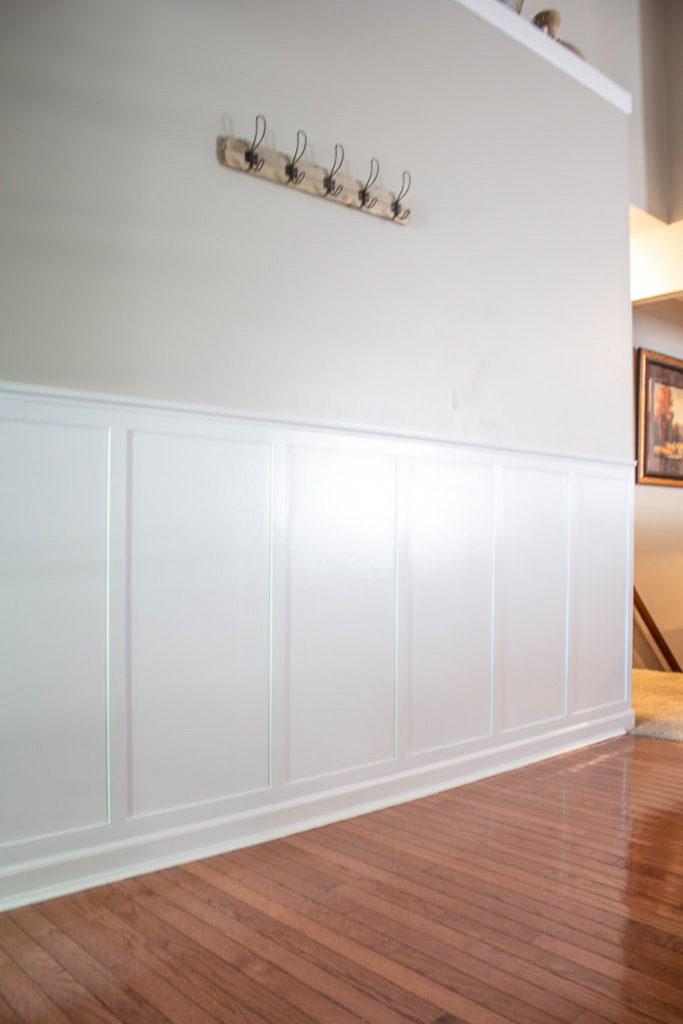
We went with a bright white paint to match the existing trim color in the rest of the house. I would choose a paint sheen that is slightly higher than your main wall colors. It adds just enough depth so that the trim pops against the wall. It’s also way easier to keep clean than your typical flat paint.
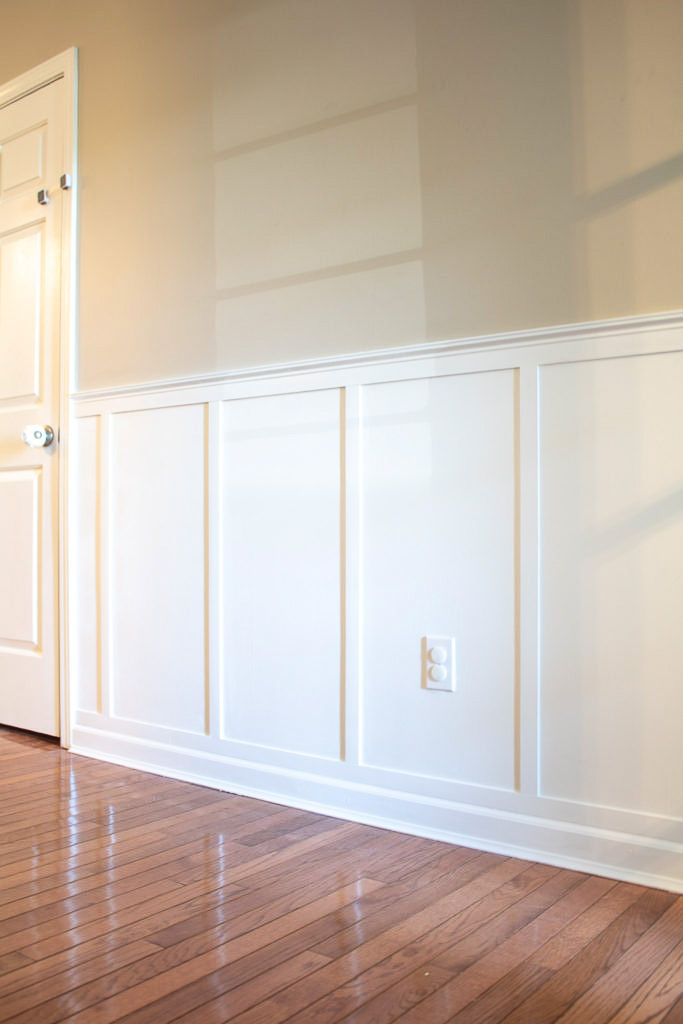

I love how this transformation turned out! The entire hallway seems so much more open and taller. Drop me a comment below if you’d like to see more ideas for adding molding to your home. As always, I hope this post helps give you the inspiration and encouragement to Love the home you have.
pin this project for later
Thanks!
Martina


It would be helpful if you made a shopping list and dtep by step instructions. I am not at all sure of which lattice you are using or the thickness, width,etc. When I go to the link, it says 1 1/2 inch? Is that what you used?
This turned out so amazing!!! It made such a huge difference in your space. We are making a list of home projects to do this summer and will have to add this to the list. Hopefully, we can do some kitchen cabinet refinishing too! Thanks so much for sharing!
Thanks so much Jackie!
So you have link to the lattice? We have same baseboards. Did you ever think of not adding the horizontal piece at bottom and go straight down to baseboards?
Hi Katelyn! Here’s the type we used https://rstyle.me/+zcChIRoMcOOjmWmrJx1SPQ. The thickness worked great to line up with the baseboards.
Thanks for the helpful post! I would never have discovered this on my own!
Beautiful job! Is the vertical and horizontal lattice the same thickness? And what is the thickness?
Thank you Courtney! It is the same and I believe it was 2 inches
I love the theme youre using in your blog Im so grateful with this post and thank you a lot for sharing it with us. Will definately keep close track of these pages.
What if the existing was is textured?!?! Sand it?
waiting answer to this question. do you sand texture wall
Hi Sharonda! You can certainly skim coat a textured wall if you prefer but you don’t have to.
Looks amazing! How far did you space your lattice? Studs are usually 16” apart. Did you put them that close or go every other stud?
Thanks!
Thanks David! We did space them about 16″ I believe
Hello! This looks great. Do you remember the name of the beige paint that’s on the walls?
Thanks!
Hi Cheyne! Unfortunately I don’t I’m sorry, this was a client’s home that she already painted
I love this project and the lattice idea so that it matches my existing baseboard. What kind of molding did you use for the top edge here?
Hi Terra! So glad you like it! We used a miniature version of chair rail molding on tops of another horizontal lattice piece.