Installing Wallpaper Yourself: 11 Tips For Hanging Wallpaper Without Losing Your Mind
Installing wallpaper doesn’t need to leave you in tears. Don’t be intimidated by this project. Read on to find out the most real-life helpful tips for doing it yourself!

This post contains affiliate links. Please see my full disclosure policy for more details.
Now that is the face of one happy DIYing momma after I finally finished installing this gorgeous wallpaper mural in my daughter’s new big girl room. But I gotta be real with you and tell you that I wasn’t exactly thrilled during this project.
Installing wallpaper isn’t for the faint of heart. And this actually wasn’t my first rodeo with it either. In fact, I tackled this budget-friendly DIY with a gorgeous peel and stick wallpaper in my neighbor’s powder room makeover last summer.
Two entirely different methods of installing wallpaper, but they both had some common themes. So I wanted to share those tips with you in hopes that keeps you from making some common mistakes that come along with trying to hang wallpaper yourself.
But before I do, I have to share some other gorgeous wallpaper murals I stumbled across at Photowall. They even sell kits with everything you would need for installation!

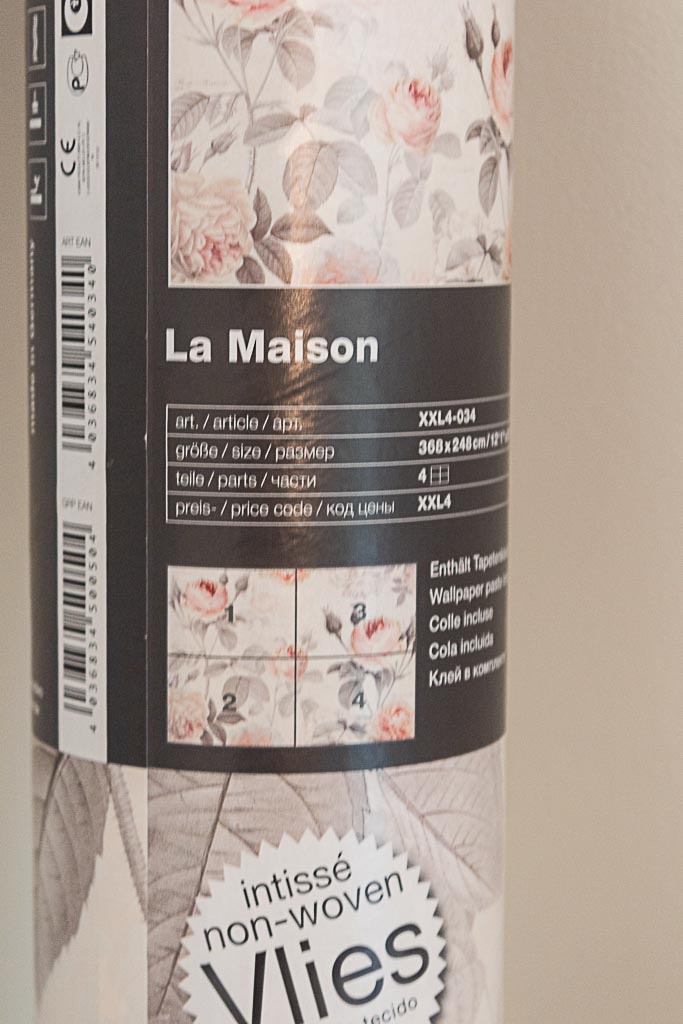
This wall was a blank slate just begging for a little DIY upgrade to make it a real focal point in my daughter’s room. When I stumbled upon this beautiful floral wallpaper mural I knew it was the perfect statement maker. Coming in four different sections, it seemed easy enough to install on one simple wall right?

Wrong!
I learned pretty quickly (well, about the third out of four sections) how to hang wallpaper the right way. As well as some handy tips for avoiding some costly mistakes in the process.
So what is the best advice for hanging wallpaper yourself?
1. Wallpaper has memory – undo it before you begin
So, what the heck do I mean when I say wallpaper has memory? Well, simply put, it’s been rolled up and packaged until you purchased it. Which is probably quite a while. And since it’s sat rolled up, it’s going to retain that curled up position once you open it.

The very first thing you’ll want to do is take the time to unroll all of your wallpaper and re-roll it the reverse way. This will eliminate the annoying curling up that wallpaper tends to do when trying to install it.
2. two hands are better than one
It probably goes without saying, but it’s always a great idea to have a little help installing wallpaper when you can get it.

My sweet best friend, who has absolutely zero DIY experience, was nice enough to get into the weeds with me on this project. Having someone unroll and hold each roll of wallpaper while you prep the wall for install is incredibly helpful.
It can be very tricky to maneuver all of the steps on your own, and if you’re covered in wallpaper paste the last thing you want to do is transfer that onto other surfaces as you move around. So stay put and handle one task while your helper works on another.
3. level it up
This was about the time that I had a total facepalm moment in our wallpaper hanging adventures. I started to get the hang of pasting and was halfway through the install when I realized I didn’t align it level in the beginnig.

See that lovely looking gap in the top right corner of the wall? Yep, that was the result of not starting level.
Beginning with your first roll, make sure that each strip is vertically level on the wall. Which mine was, but the ceiling wasn’t. And simply lining the edges up right at the ceiling didn’t cut it. By the way, no wall is ever level guys.
After leveling your paper to the wall, make sure that you overlap the paper to the ceiling and adjoining corner wall by at least 6 inches. This gives you enough overhang to work through any troubling uneven walls and ceilings.
4. be generous with the paste

Our wallpaper mural came with a pre-measured packet to mix the wallpaper paste and I was concerned that this small amount wouldn’t be enough to accomplish the job. So I was super conservative while rolling it onto the walls.

The result? It wouldn’t stick. Shocker, I know. As soon as the paste would start to dry, the wallpaper would begin bubbling up in all of the areas where I skimped on the paste.
Make sure to be generous when applying any wallpaper paste, especially in corners, towards ceilings and where new sheets line up next to one another. Roll it on extremely thick and use a paint brush to work into any corners or edges of walls.
5. work quickly

That’s right, giddy up buttercup. As soon as you apply enough paste for your first wallpaper sheet get ready to install it like asap. Like I mentioned above, the paste tends to dry fast so you need be quick about getting it up. Don’t worry about perfection at first. As long as you were generous with the paste you’ll have enough adhesion to be able to move the wallpaper around to get it nice and level.
6. squeegee
If you’re an OCD perfectionist (raising my hand high over here), then this is the one of the biggest time consuming steps that could drive you mad. But, since this post is full of helpful advice to keep you from going insane with your wallpaper install, then you’re in good hands.
As long as you were generous with your wallpaper paste (See how I keep reiterating this tip? it’s important, like really important), then this step will be a breeze.
Air pockets tend to make their way in behind the wallpaper and on the surface of the wall while you’re installing. This creates those pesky little bubbles in the surface of your wallpaper that can be such a nuisance. Rest assured, I have a tip for this too.
I felt like a traditional rubber squeegee was too soft to smooth out a wall surface. So I took a simple painter’s edge, wrapped it in a thin towel, and ran it across the entire wallpaper surface to smooth out any air bubbles that remained. It can be a sharp surface, so wrapping it in a towel prevents it from being able to rip the wallpaper along the way.
And don’t use a light hand. Really apply some pressure as you push those air bubbles out.
7. line up patterns

Working with traditional wallpaper can be a little tricky when it comes to patterns. You want to do your best to line wallpaper strips as close together without overlapping them. The pastes helps to allow you to move the wallpaper around until you can position it just right. But I also found it helpful to apply a small amount of paste directly on top of the adjoining sheet using my roller. It seemed to help close up any visible seems and lessened any more air from getting behind the surface.
8. keep scissors handy for tricky corners
Ah corners. They are the nemesis to any wallpaper project. It’s extremely difficult to wrap wallpaper around corners, and it’s also not recommended with traditional wallpaper because the surface can expand and pull up over time. That’s why you’ll want to keep a pair of scissors handy so that you can cut a diagonal slit from the ceiling or floor areas in the corner of your wall to allow it to lay flat until you’re able to trim off the excess with a razor blade.
9. trim as you go

Even though the instructions for our wallpaper mural strictly said not to trim off the excess corners until the paste has dried, I rebelled. It just wasn’t working for my walls. It could’ve been user error, but I found that my wallpaper would settle and lay flatter after I trimmed off the excess corners using a sharp razor blade knife.
If not, it would continue to peel up at the sides and let more air in behind it. This was definitely a part of the instructions I was willing to break away from, and glad that I did. It laid so much nicer and made the rest of the install go faster.
10. use a wet sponge for excess paste

No matter how careful you are during your wallpaper installation, you’re going to end up with excess paste on other surfaces like your ceilings, adjoining walls and even the wallpaper itself. The good news is, this stuff tends to clean up pretty easily as long as you catch it before it dries.
Having a damp sponge nearby helps to clean these areas as you go and wipe off any execs without damaging your beautiful wallpaper.
11. Just keep going
This is really more motivational than it is a helpful tip, but like I mentioned in the beginning; Installing wallpaper is HARD. But you get better as you go, and it’s an awesome feeling to stretch those DIY muscles. Sure you might make a few mistakes, but you’ll learn to pivot and correct it as you go.
Remember that part of my wall that I didn’t level properly and installed too short?

Well, I came up with a genius hack to use some lattice trim to paint and frame out the mural wall to cover up my mishap. And you know what? It looks better than my original plan anyway.


Want to see the rest of the room reveal when it goes live? Be sure to sign up to my weekly newsletter below to get alerted. You’ll also be added to my exclusive decorating and DIY community where I share my best tips, tricks and décor finds to help you love your home!


One Comment