How to Decorate a Christmas Tree Like a Designer
A beautifully decorated Christmas tree is the most iconic element of the season. Filled with magical twinkling lights and generations of handcrafted ornaments made by the tiniest little hands.
My favorite Christmas tradition as a child was filling the tree with curated cartoon ornaments and my very own DIY popcorn garland. While I love the beauty and memories that a gorgeous nostalgia tree represents, I also love the opportunity to decorate our Christmas tree to coordinate with a theme in our home.

This post contains affiliate links. Please see my full disclosure policy for more details.
Styling your tree with a coordinated look takes a little more effort, but the outcome can be a beautiful professionally decorated tree that could take its place in a department store window.
If you want to take the stress out of decorating your tree, you can always pick up a coordinated Christmas Tree kit!
Last week I shared some beautifully themed trees as inspiration for you from my fellow bloggers. But I wanted to put together some steps you can follow to decorate your own Christmas Tree just like a professional designer.
Step 1 : Fluff Your Tree
The first thing you’ll want to do before you begin decorating your tree is to fully fluff all of your branches.
This is my absolute least favorite step, but it’s also the most important part. The more time you spend fluffing and bending the branches into place, the less chance there is that you’ll have bare spots within your tree.

Start by separating all of the tips within the individual branches. Pulling them apart and positioning them in different directions creates a full fluffy look on the ends of your branches.
Next work around your tree starting at the base to bend your branches into place and fill any large gaps.
I’ve found that each year after pulling my tree out of storage the branches need a little extra love and require some manipulating to keep them from having a droopy appearance. It could just be the hinges of the branches on my tree have come a bit loose.
I haven’t really dug in to investigate. To be honest I don’t really care to. Putting my arms inside the tree just to fluff it leaves enough scratches on my hands and arms without the additional torture.
Pro Tip
Wear long sleeves and even thin mittens or gloves to protect your bare skin from a scratchy tree fluffing session.
If you’ve taken the additional time to fluff your tree, you should end up with a much fuller look than you started with. At this point, any remaining bare spots will be hidden with ornaments, ribbon and other decorative accessories.
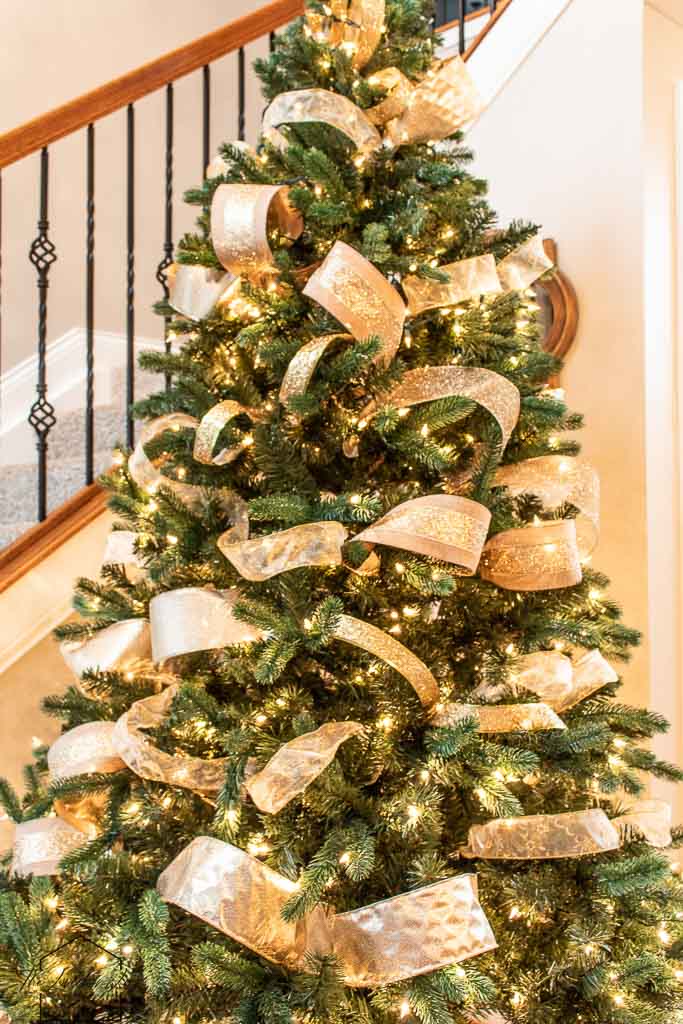
Step 2 : Add ribbon
Next, you’re going to gather assorted sizes and colors of ribbon to begin adding to your tree.
Full disclaimer. I ran out of ribbon decorating my tree and was trying to get by using scrap rolls that I had left over from previous seasons.
I would recommend purchasing more than you think you’ll need for this step, because you may find that you have additional gaps that you need to fill.
For a professionally designed look, aim to use 3-4 different types of ribbon for your tree Varying from wide width to a smaller thin ribbon size. For a typical size 7 ½ foot tree, you would need about 2 rolls of each type ribbon you choose.
Any less than this won’t be enough to adequately cover your tree.

My favorite places to find beautiful unique wire ribbon for my trees are Hobby Lobby, Michaels and At Home.
Wide mesh wire tends to be the easiest to work with as it grabs on to any branch for a secure hold, but any wire ribbon can be bent into place to create an elegant flowy look.

Start with your widest ribbon as your base, measuring and cutting three-foot-long strips to place in your tree.

Tuck one end of the ribbon inside your tree bending and wrapping it to secure it to your branch.
Next, gently pull it straight out and leave a little slack as you grasp the middle of your ribbon to pinch and tuck it back into the tree.

This creates a billowy loop type look with your ribbon. Finally, secure the end of your ribbon to a nearby branch, again leaving slack to create a second loop.
Repeat with assorted ribbons
Repeat this process throughout your tree with all of your widest ribbon. I typically place mine in all different directions (diagonally, vertically and horizontally) to add dimension to the tree.

Finally, end by adding your thinnest ribbon to your tree. Because thin ribbon tends to be a bit flimsier, you may find that you want to create three shorter loops rather than two large ones for each section.

I have an entire post on different Christmas tree ribbon techniques, so be sure to check them out for a little more inspiration.
Step 3 : Fill with florals
You’ve done the hardest work by taking the time to generously fluff your tree and add plenty of ribbon for texture and fullness, but unless you have the most expensive high-quality tree, you’re still going to have some gaps that require filling.
That is why I love large floral picks so much. They’re an easy way to fill any gaping holes within your branches and they also add a wow factor to your Christmas tree.

One of my favorite ways to save money on this step is to purchase inexpensive floral bushes from the craft store and snip off individual flower stems to create my own tree picks.
I used 4 floral bushes total for this tree (2 poinsettias and 2 hydrangeas). You don’t always have to use Christmas florals either.
You can find some beautiful inexpensive bushes in non-traditional Christmas colors within any floral section of a craft store.

Begin filling in your largest gaps first making sure to evenly space out the florals around your tree.

Continue adding the remaining florals throughout your branches.

Step 4: Add Ornaments
Finally, you’re ready to add ornaments to your tree. You can probably already tell that I love decorating a themed Christmas tree.
This year I opted for a solid burgundy color scheme. A nod to my winter wedding colors. I also placed small berry clumps throughout the tree for a special touch.

Start by adding in your ornaments beginning with the largest or most uniquely shaped ornaments first, making sure they take center stage appearance on your tree.

Lastly, fill in the remainder of your tree with your smaller sized ornaments to finish off the look.
Make sure you have a variety of finishes if you’re working within the same color family to give your tree some dimension. I chose a matte, glitter and shiny metallic color scheme for my burgundy tree.

Personally, I love a tree so heavily covered in ornaments that you can barely see the green branches through them.
Sadly, I ran out of ornaments decorating this tree and since we were heading out of town I chose to leave it as is. I still think it’s a beautifully decorated Christmas tree though.

Step 5: Top Your Tree
I know that stars and angels are a traditional tree topper and I do love them. But, I also love crowning my tree with some unique floral picks like these gorgeous berries I dug out of storage from my own wedding centerpieces.

I simply stuck the berry picks straight down through the top of the tree and the surrounding branches held them upright.

It complemented the red florals and added a little something extra to the top of the tree for a unique and fun look.

I hope this post helped to give you some tips to style your Christmas tree a little differently this year. I’d love to know what you think, so drop me a comment below and tell me what your favorite way to decorate your tree is!


Thanks for the tip that having ornaments will help a lot in making a Christmas tree look more grandiose. I’d like to look for Christmas decorating services in a few months because I’d like to make my front lawn look very cheery this year. I think that will help in avoiding a gloomy neighborhood like last year’s holiday season.
Glad it was helpful Alice!
Love this! Using this as inspiration for our Christmas wedding this year. 🙂
Hi Emily! So happy to hear that! We had a Christmas wedding also. 🙂
You have noted very interesting points ! ps decent site.
Does your christmas tree look too old fashioned? When it comes to decorating christmas trees there are some style tips to follow so that they look more up-to-date and stylish.
It’s “complemented”, not “complimented. The ornaments and decorations should complement each other, which would result in you receiving compliments on your holiday tree.
Wow, these red flowers make the Christmas tree especially charming! Thank you for sharing
Thanks so much Mia! Happy Holidays!
This was an incredible read. Thank you so much for creating it.
First of all, thank you so much for sharing! These tips are awesome! Your tree looks amazing. I will try to decor a Christmas tree this Christmas. Actually, I never try it.
Martina! What a truly beautiful tree! Such great tips! I absolutely love your tree because personally I love ribbons and reds!
Thank you so much friend!!!